So over these last few days I've found projects to keep me busy and distracted.
After being given the first letters of Rachael and Abi's names a good while back that I hung above their beds on the wall, I decided it would be cool to have one for Hannah as well. Before we got a second glimpse at Hannah's gender (when we found out that she was breached) I was debating leaving the letter off the wall until we were certain of gender come delivery day. Even though they get a good look at her gender at 21 weeks, you never know. After we discovered she was breached we were certain of her femininity with a clear, unmoving picture. At 37 weeks she would have had VERY obvious boy parts should she have been an Elijah Joel. ;)
So the letter on the wall was now an option.
I started off to the craft store with the girls to buy an H in the same letter series that the girls' letters came from. Unfortunately in the past two years the craft store had stopped selling that line of letters. So I became more creative. Still wanting things to be reasonably priced, I opted for the simpler letters for $1.50 a piece instead of the $3 ones since I'd now be purchasing three letters, one for each of the girls, so they matched. With the $1.50 letters I was also able to give Rachael and Abi a choice from a few decals to put on their letters. Hannah got the default one after Rachael and Abi picked.
When we got home and the girls were down comfortably for their nap, I used some nearby paint left over from painting the nursery "back in the day". I painted all three letters the same so they'd match and then attached their decals to the letters with sticky tac so they could exchange decals later if they wanted or the decals could be used to decorate other things in the future.
Thus I give you their letters: It was a few hour project due to allowing paint to dry.
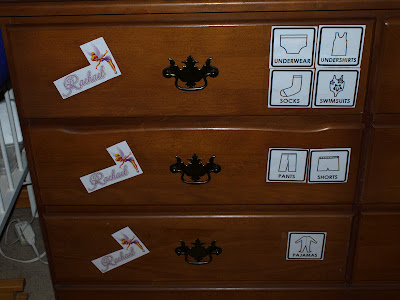
I also decided to label the girls' drawers and put up words/pictures to help them in putting away the laundry. Rachael has her drawers memorized as to what should go where, but Abi often will forget between the couch and her squealing run down the hallway just what drawer you asked her to put her clothing into. So in an effort to reinforce literacy for Rachael and encourage Abi's independence, I found these labels online. I printed them off and slapped their beautiful black/white selves on the drawers.
And that happy little project also extended to the closet where the organization is a happy perk in easy communication of hang-up items.
Then I saw a pinterest post of a do-it-yourself butterfly mobile and thought instantly "I'd like to do that..... some day" well some day came over the last few days. While I chose not to use the above tutorial, I did print off a basic outline of a butterfly from searching "clipart butterfly" on google images. Then I printed off 10 pages of black/white butterflies. Since I wasn't worried about rushing the project, but instead about filling time with a fun craft, I wasn't concerned that I planned to color each of the 60 butterflies' front and back (120 total) and then cut each one out. I used a cross-stitching wooden ring as my circular base. I then painted it white as a primer and a light pink (mixed from the old nursery colors). I used some clear fishing line found in the bracelet section of the craft store ($2). Thanks to borrowing a friend's glue gun (I don't have one), I tied and glued the fishing line to four spots on the top of the circle, attaching a small washer to the top as a "hanging hook." I then glued nine butterflies around the upper circle. Then I attached the various lengths of fishing line hanging down from the circle. After each butterfly was colored and cut out, I hot glued each at various places to each of the eight hanging strings. I did some basic math to use the remaining butterflies to attach at least six butterflies per string.
Now I did have some battle scars from gluing the butterflies on: burnt fingers, two thumbs, a spot on my wrist, and, sadly, the pad of my right foot from dripping glue. But honestly I really enjoyed the project without the time commitment feeling too laborious. And thus the product that hangs above the changing table in the nursery:
Fun projects. More simple home improvement. And time well spent. =D


No comments:
Post a Comment